Peanut Butter Cup Pie
Introduction
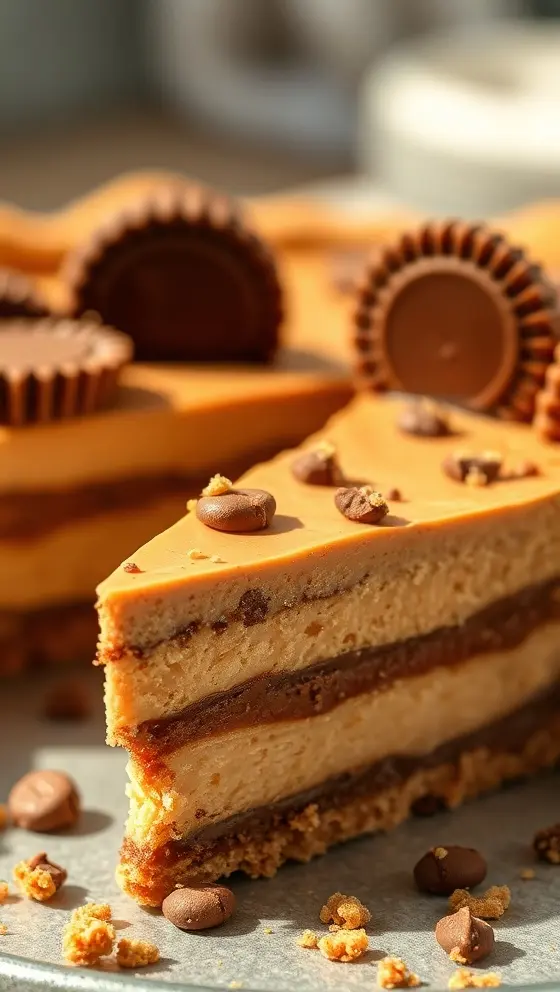
If you’re in search of a decadent dessert that combines rich flavors and impressive presentation, look no further than Peanut Butter Cup Pie. This delightful pie is a chocolate lover’s dream, featuring a creamy peanut butter filling nestled in a crumbly crust, topped with chocolate ganache and scattered peanut butter cups for that perfect finishing touch. This dessert is not only easy to prepare but is also guaranteed to leave your friends and family in awe. So, roll up your sleeves and get ready to create a dessert that combines simplicity and indulgence in every bite.
Ingredients List
To whip up an incredible Peanut Butter Cup Pie, gather these simple ingredients that are sure to impress even the pickiest of eaters:
– 1 ½ cups of Graham cracker crumbs (about 10 whole crackers)
– ½ cup of unsalted butter, melted
– ½ cup of granulated sugar
– 1 cup of creamy peanut butter (or crunchy if you prefer more texture)
– 1 cup of powdered sugar
– 1 cup of heavy whipping cream
– 1 cup of semi-sweet chocolate chips
– ¼ cup of heavy cream (for ganache)
– Mini peanut butter cups, for garnish
– Optional: A pinch of salt to balance flavors
These ingredients come together to create a luscious Peanut Butter Cup Pie that you will want to make again and again!
Timing
Before diving into the step-by-step instructions for this irresistible Peanut Butter Cup Pie, let’s prepare for the timeline involved in this dessert:
– Preparation Time: 20 minutes
– Refrigeration Time: 4 hours (or overnight for best results)
– Total Time: Approximately 4 hours and 20 minutes
Having a little patience while the pie chills will reward you with a perfectly set dessert that offers a zesty balance of flavors and textures.
Step-by-Step Instructions
Ready to create your delicious Peanut Butter Cup Pie? Follow the step-by-step process below:
1. Prepare the Crust: Begin by preheating your oven to 350°F (175°C). In a mixing bowl, combine Graham cracker crumbs, melted butter, and granulated sugar. Stir until the mixture resembles wet sand. Press the mixture firmly into a pie dish, ensuring that the bottom and sides are evenly covered. Bake for about 8-10 minutes until lightly golden. Remove from the oven and allow to cool completely.
2. Make the Filling: In a large mixing bowl, beat together the creamy peanut butter and powdered sugar until smooth. In another bowl, whip the heavy cream until stiff peaks form. Gently fold the whipped cream into the peanut butter mixture, ensuring it remains light and airy. Once combined, pour this filling into the cooled crust, smoothing it out evenly.
3. Prepare the Ganache: In a small saucepan, heat the ¼ cup of heavy cream over medium heat until it is just about to boil. Remove from heat and pour over the chocolate chips in a bowl. Let it sit for a minute before stirring until you achieve a silky ganache. Pour this chocolaty goodness over the peanut butter filling.
4. Garnish and Chill: For the finishing touch, arrange mini peanut butter cups on top of the ganache. Once decorated, cover the pie with plastic wrap and refrigerate for at least 4 hours, or ideally overnight, to allow the flavors to meld and the texture to set.
5. Serve and Enjoy: After chilling, slice the pie with a sharp knife (perhaps dipping it in hot water beforehand) and serve to your eager guests. The creamy peanut butter layer paired with the luxurious chocolate will leave everyone begging for seconds!
Nutritional Information
For those keeping tabs on nutrition, here’s a general breakdown per slice (assuming 10 slices):
– Calories: 350
– Total Fat: 25g
– Saturated Fat: 12g
– Cholesterol: 30mg
– Sodium: 180mg
– Total Carbohydrates: 30g
– Dietary Fiber: 2g
– Sugars: 18g
– Protein: 7g
This delicious Peanut Butter Cup Pie treats the taste buds while still being a satisfying dessert option in moderation.
Tips
To ensure your Peanut Butter Cup Pie turns out perfect, keep the following tips in mind:
– Experiment with Flavors: You can enhance the pie’s flavor profile by adding a touch of vanilla extract or substituting the semi-sweet chocolate with dark chocolate for a richer taste.
– Crust Texture: Ensure the crust is compact; if not tightly pressed, it may crumble when slicing, leading to frustration.
– Chilling is Key: To achieve the best texture, patiently refrigerate the pie long enough so that it solidifies perfectly.
Alternative Methods
If you want to switch things up, consider these alternative methods for your Peanut Butter Cup Pie:
– No-Bake Version: For a quicker option, you can try a no-bake version. Simply skip the oven step for the crust and just refrigerate the crust before adding the filling.
– Gluten-Free Option: Use gluten-free Graham crackers or nuts blended into a fine crumb as an alternative crust option.
– Vegan Version: Substitute ingredients appropriately; use non-dairy cream, nut butter, and a vegan pie crust to make a delicious vegan Peanut Butter Cup Pie.
Common Mistakes to Avoid
While making your Peanut Butter Cup Pie, look out for these common pitfalls:
– Overmixing the Whipped Cream: When folding whipped cream into the peanut butter mixture, be gentle. Overmixing can cause the filling to deflate, leading to a denser pie.
– Underbaking the Crust: Ensure the crust is baked just enough for a slight golden color to prevent it from becoming soggy after pie assembly.
– Impatience with Cooling Time: A good refrigeration time is essential; don’t rush! The flavors truly develop when the pie is allowed to set properly.
Conclusion
In conclusion, making a Peanut Butter Cup Pie promises to be an exciting and rewarding cooking adventure. This pie doesn’t just offer rich flavors but also provides an opportunity to impress your guests with minimal effort. The compelling creamy peanut butter filling and indulgent chocolate ganache are sure to make your gatherings even more memorable. So gather your ingredients, follow the steps, and prepare to enjoy a slice (or two) of this delicious dessert. Be sure to return to my website for more delightful recipes—there’s always something new and exciting waiting for you!
FAQs
1. Can I make Peanut Butter Cup Pie ahead of time?
Absolutely! In fact, it tastes even better when allowed to chill overnight. Just make sure to cover it well to prevent any odors from the fridge from affecting the flavor.
2. How do I store leftovers?
Store the leftover pie in an airtight container in the refrigerator for up to five days. Each slice will continue to be delicious!
3. Can I freeze this pie?
While you can freeze this pie, it’s best to freeze it before adding the ganache and garnish. Wrap tightly and freeze for up to 2 months. To serve, thaw in the refrigerator before completing the decoration.
4. What can I use instead of gluten-free graham crackers?
Feel free to explore various alternatives, such as almond flour cookies or crushed nuts mixed with coconut oil to make a base for your crust.
5. Can I adjust the sweetness?
Certainly! Feel free to decrease the amount of powdered sugar in the filling or garnish to fit your taste.
Peanut Butter Cup Pie

Ingredients
- 1 pre-made pie crust
- 1 cup creamy peanut butter
- 1 cup powdered sugar
- 1 cup heavy cream
- 1 cup chocolate chips
- 1/2 cup milk
- 1 teaspoon vanilla extract
Instructions
- In a mixing bowl, combine peanut butter and powdered sugar until smooth.
- In another bowl, whip the heavy cream until stiff peaks form.
- Fold the whipped cream into the peanut butter mixture until well combined.
- Pour the mixture into the pre-made pie crust and smooth the top.
- Melt the chocolate chips with milk and vanilla extract in a saucepan over low heat.
- Pour the chocolate mixture over the peanut butter layer and spread evenly.
- Chill in the refrigerator for at least 2 hours before serving.
Nutrition Information
- Calories: 350 kcal
- Protein: 8g